Working with graphics
Graphics make your document more attractive. You can easily add graphics to your document. You can also scan pictures and download them. Nebula Office Writer supports almost all formats of images. It can also imports data from the Microsoft documents. If you want to know about graphics, then you are in the right place. In this article, we are going to provide the basics of working with graphics in a Writer document.
Types of Images in Writer
- Photos, drawings, images.
- Diagrams made through drawing tools and software.
- Clip Artwork
- Chart facility documents
Bitmap editor helps us in editing pictures. You must take care of the image quality while editing. The vector drawing program helps us to edit the line drawings. You should create the exact dimensions for the best results. You can also change the brightness, contrast, size, etc. of the image using the tools. Do not use high-resolution images if you have screen work.
Nebula Office Writer
You can also use the tools of the Nebula office writer. You can draw simple diagrams using tools such as rectangles, circles, lines, etc. You can use tools to manipulate or change the photographs and screen captures.
Adding images
There are many ways to add images in a document. Some of them are:
- Insert a file that is already present on your computer.
- Insert from a scanner directly in the document.
- Inserting from clip Art by using drag and drop option
- Copy and paste on your document.
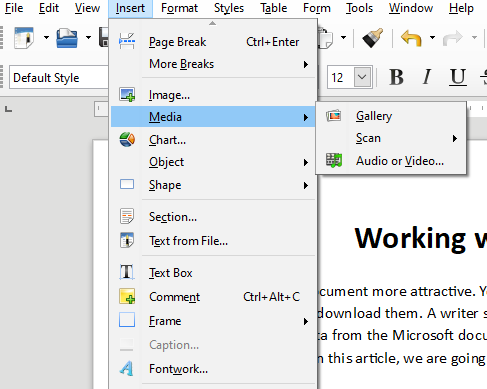
Insert image through dialog
To use dialog box options to insert an image, follow these steps:
- Click on the document where you want to add the image.
- Click on the insert option.
- Now, click on the image option.
- Select the file that you want to insert.
- Click on open.

Drag and drop
To use drag and drop options to insert an image, follow these steps:
- At first, open a browser. Locate the image in the browser.
- Now, drag the image.
- Drop the image at the appropriate place.
Copy and paste of the image
To use copy and paste options to insert an image, follow these steps:
- Open the document where you want to insert the image.
- Open the document from where the image is to be inserted.
- Select the image that is to be inserted.
- You can press CTRL+C to copy the image and CTRL+V to paste the image.
- You can also right-click and select the copy option to copy the image.
- You can also right-click and select the paste option to paste the image.
Insert an image using gallery
To use the gallery and its options to insert an image, follow these steps:
- Click on the gallery option.
- It is present on the sidebar.
- Select a theme of your choice.
- Select the object of your choice.
- Now use drag and drop options to insert images in the document.
To delete an image, select the image and press the delete key.
How to Link the image?
You can also create a link of the file which has the image. This is another way of displaying the image in the document. When we save this document, it only has a reference and the picture is not displayed.
Advantages of linking an image
- You can also change the file at any time. This altered image will appear in the document automatically. This is a big advantage of linking an image.
- It shrinks the size of the document. This is because the image is not displayed in the document. The document contains only a reference. Nowadays, the size is not a challenge for modern computers.
One major disadvantage of linking an image is that when we send the document to anyone else, the image does not appear in the document.
Embedding linked images
For embedding images follow these steps:
- At first, Open the document.
- Click on the Edit
- Select the Links
- A new dialog box of Edit Links appears.
- Select the files in the Source file list that you want to change from linked to embedded.
- Click on the Break Link
Options: This tool helps us to give a name to the image. It displays a text over the image.
Borders: This tool helps us to add borders to the image. It also helps us to add shadow to the image.
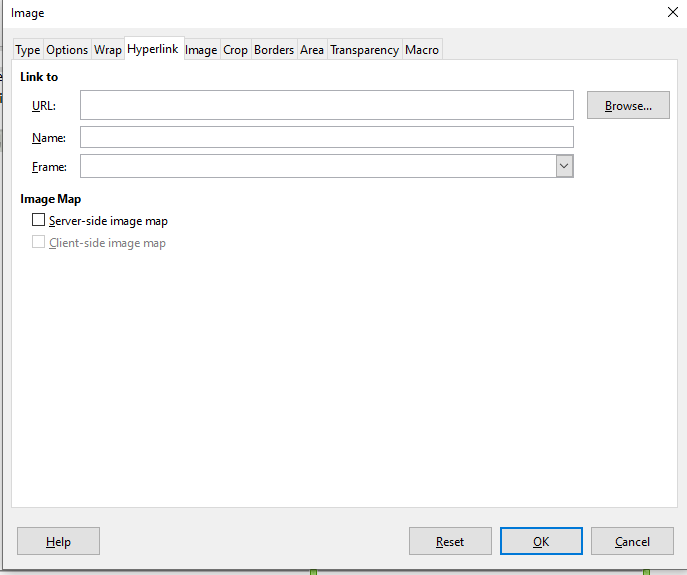
Hyperlink: This tool helps us to create a map to the image.
Area: This tool helps us to alter the color of the background of the image.
Macro: This tool helps us to associate a macro to the selected image.
There are 4 options to arrange an image in the document. They are:
- Bring to front
- Forward one
- Back one
- Send to back
- To background
These were some of the basics of working with graphics and images. We hope this article was helpful to you.
Read more articles