Nebula Office is widely used software that helps in working with sheets, documents, and presentations. It is free office software for Windows and works fine with Google sheets, Google slides, and Microsoft office.
If you are working in any organization, you will know how important a presentation is for the company to convince the clients about the products they offer.
A PowerPoint Slideshow alternative to Microsoft PowerPoint – Impress, a program under Nebula office helps you to make creative presentations with advanced features and different tools.
If you want to learn more about it, read till the end.
About Impress
Impress includes three parts, which are Slides pane, Workspace, and Sidebar. Among these, the Workspace is particularly designed in such a way that it makes presentations easier to work with.
Workspace
Under Workspace, we have five tabs. These are –
- Normal
- Outline
- Notes
- Handout
- Slide Sorter
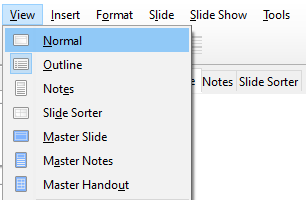
These tabs change the way the Workspace looks.
Note:
You can select or place a slide in the design area by clicking on the slide thumbnail under Slides pane.
Normal View
It is the main viewing window for the presentation. One creates the slides individually and then can add details such as text, animated effects, and graphical illustrations later.
Outline View
It lists all the slides in its numerical order. The slides shown in this view include the topic name, numbers, and bullets. However, only the text is visible excluding graphics and the slide name.
With the Outline View:
- You can also add or delete text to a slide
- Using the arrow buttons on the Text Formatting toolbar, you can re-arrange the paragraphs of the text (arrows Up and Down) and also change the level of Outline (arrows Left and Right)
- You can compare the slides and make necessary changes (adding or deleting slides) as per your choice.
Notes View
It helps in adding notes to the slides, which are important for references and remembering points. These notes will not be displayed on external monitors.
- You can add them by selecting the particular slide and then clicking on Add Notes in the textbox below.
Note
By selecting the edge of the Note box, you can either reframe it or move it around by holding and dragging the notes section until you have it in place. To make changes to the style, open the Styles and Formatting window or press f11.
Handout View
It refers to how the hardcopy of your presentation will look like and helps you to arrange and adjust the number of slides in it. You can play with the Slides and arrange them in your desired format among the various designed layouts shown on the Sidebar.
- To make changes to the Handouts Page and the elements, go to the Main Menu > Insert > Page Number or Insert > Date and Time and also Header and Footer window and add the details.
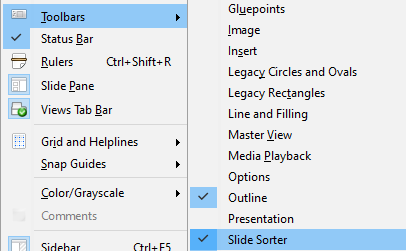
Slide Sorter View
It views all the slide thumbnails and makes it easier for you to work with one or multiple slides at the same time.
- Adding and moving One or Multiple Slides
Click on View> Toolbars > Slide Sorter and Slide View and edit the slides. (Maximum number of slides- 15)
- To move one slide, click on it and drag and release it to the desired location.
- To move multiple slides, select the slides using either –
Ctrl key – click on the first slide, hold on to the ctrl key, and keep selecting all the slides one by one.
Shift key– click on the first slide, press shift, and select the last slide. This automatically selects all the slides in between the first and the last one.
Using Mouse – Select the first slide from one of its edges and drag the mouse to select all of them, one by one.
After selecting the slides using one of the following methods, you can simply drag them along and release them on the desired location.
Slide Sorter works just like the Slides pane. To make changes to the selected slide, simply right-click on the slide and choose one:
- New/ Delete – to add or delete slides
- Duplicate/Rename – to make a copy or to rename the slide
- Layout/Transition/Hide – to change the format; the transition or to hide the slide
- Cut/ Copy/ Paste – move it to the clipboard; make a copy or paste the copied slide from the clipboard.
Conclusion
Impress is quite easy to work with and can help you to ace your presentations and make them look sophisticated.