As you have already noticed that you just can’t use the copy and paste options all the time for the DVD, CD, and Blu-Ray disk drives. In any instances, did you ever think of it how you could keep all the data like songs, music, videos and save it into your system/computer as a backup? Nebula media player can this quickly. You can easily rip the DVD Audio CD’s, Blu-ray and the video CD’s as well.
Yes, you can now do this by following some simple steps and utilize one of the best features of Nebula media player. Later, you can save the entire content on your computer, laptop.
Currently, all these disks are not that much popular like there were before, but some are still using these for their different purposes. You must have these drivers in-built in your laptop and where it has the old music CD’s, Blu-Ray movies, DVD and VDC, you can take the back on your computer easily.
The process is very similar as you download the videos online, but here you are downloading it from the CD’s, DVDs etc. Nebula media player will rip out all the files and then extract them in some modern and most famous digital formats such as- MP3, MP4. You can store these file for a longer time on your desktop, laptop or Mac as a secured backup.
How to rip a DVD, Blu-Ray, Audio CD or SVCD/VCD?
We have described above about the ripping, now here are the steps how you can do this using Nebula media player-
- The first step is to insert your DVD, CD, Blu-Ray Disc, Audio CD or Video CD into the disk drive in your PC, laptop, or Mac.
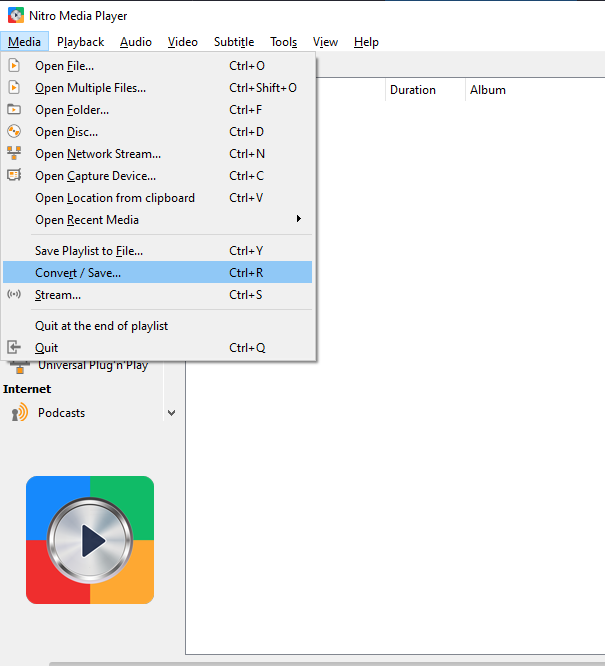
- Now, open Nebula media player and access Media>Convert/Save (CTRL + R).
- Next, click on the Disc
- Select the disc type- DVD, Blu-ray, Audio CD or SVCD or VCD
- Check No disc menus option.
- Select your preferred Disc from the given drop-down or Browse to select it
- Click Convert/Save
- Now, select a Profile: (a) Video – H.264 + MP3 (MP4), which works nicely for the videos and (b) Audio – MP3 works nicely for ripping the audio CDs.
- Now, click on Browse and select the destination file.
- Click start, and it will begin the Audio/Video ripping.
After performing all the above steps, you will see a progress bar in the interface of Nebula media player. It will display how much copying and ripping have been done. In case you do not see the progress bar is moving ahead, you click on the play button to fix it.
During the process of copy and ripping, you can pause it anytime; however, we don’t recommend this to you. Once the process is finished, you can browse the destination where you want to save all the ripped and copied audio and video files.
Now, you can copy all the files and move to any location you want to save it. You will have many options to save the files such as- External drive, computer’s hard drive, Cloud storage Google drive, etc.
For more safety and security of your personal files, you can also convert them into a different format using Nebula media player. All the files will be safe and will not get lost because of any damages such as disc scratches or anything else.
Let us know how the above steps have helped while ripping and copying the audio and videos.