While watching your favorite movie, on Nebula media player, obviously you do not want any interruption.
Well, now no more interruption, as we have a complete guide for you, where you can do some easy settings and make perfect as per your preferences. Now you can set nebula player always on the top, hence no more scrolling and findings now. In this article, we are sharing the guide with you on how you can set it on the top.
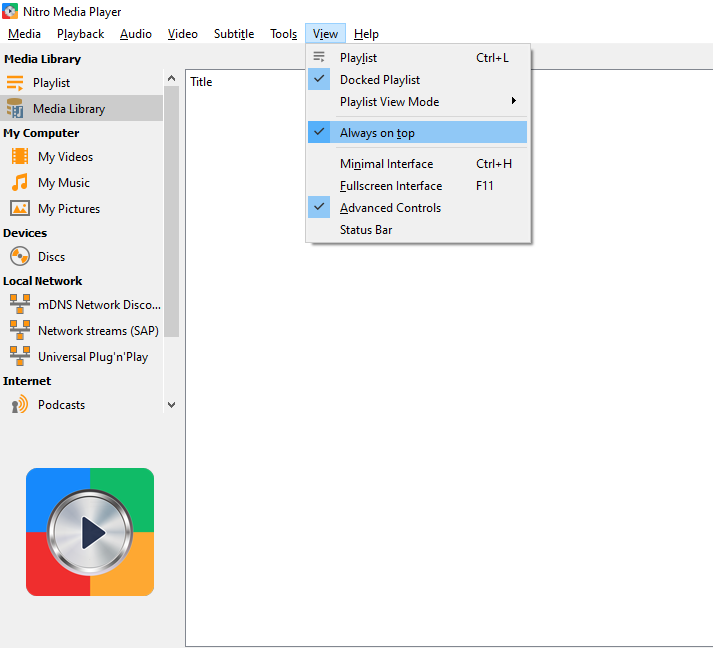
Here is the first thing you should do- Go to the View>Always on Top option.
Once you activate this option, the other programs or application will not overlap or be displayed over Nebula media player on the computer. Now your computer, Mac, or laptop will be giving Nebula media player the first priority. Other application or programs will no longer show you a single popup or disturb you while watching your favorite movies or videos.

This advanced option becomes more useful when you have such items, which show the notification or popup on your window much frequently. Therefore, when you check this option “Always on top” you then need to set this option off manually. Alternatively, you can minimize Nebula media player to provide the screen space to other applications/programs.
Nebula Media player has some additional features to ensure that the option “Always on top” has been activated as a default feature. It also indicates that Nebula media player will keep this feature on whenever Nebula media player will be launched. Also, this setting will keep it sure that the user won’t be going to the view menu if they want to activate this setting each time.
Over here are the steps to activating the option “Always on top”:
- Click on the “View” from the menu bar alternatively you can right-click the menu.
- Now, click on “Always on top.”
Now, if you go to the menu again, you will see one small check mark, which is available next to the option “Always on top.” It will indicate you the setting is now activated. Now, when you keep this setting on, you will need to minimize Nebula media player each time to use other applications or programs when they maximized.
Apart from this, if you restore Nebula media player to the smaller size, it will overlap other application in that particular area. Also, when you switch to another program, Nebula media player will take over. Hence, if you want to disable this, you will be required to uncheck the option. You can do this by repeating the above steps. Also, you can minimize the program and close the window.
How to Enable/Disable Always on Top option by Default?
While you are closing and reopening Nebula media player, the option “Always on top” is not activated. It will be shown uncheck as default. Now, you will be asked to check it each time you use the application. If you ever feel you are doing the same thing frequently, you can again set it as default by using the above steps.
Here are the steps to check the option “Always on top” for every time:
- First, go to option Tools>Preferences (CTRL + P)
- Now, go to the Advanced Preferences by clicking on “All” at the bottom left.
- Next, click on Video.
- Check the option “Always on top.”
- Click Save and you are done.
