Nebula Office uses efficient tools to create documents. It is a multi-suite that works on all Windows versions. Nitro is a complete package of functional elements. It includes Writer, Impress, Draw, Calc, and other math formulas.
You can create any kind of document with the Nebula Office. You can open and edit other files. It is complete software for all office and household needs. This is often compared with MS Office and Google applications.
Impress is for presentation documents. You can create slideshows, show statistics, and much more. In this article, we will begin to learn about functionalities in Impress. Elements like adding pictures and tables are basic in a presentation. So, we will know more about these features.
Using Impress
Impress is a presentation program to create slideshows. It has several features like adding tables, drawings, graphics, and text. A presentation helps you to convey and reach messages easily. The slide transitions, graphics, and other features are wonderful in Impress. You need to know about its elements to work. This gives a better idea to start and also improve the quality of the presentation. Here we will look into adding pictures and tables in Impress.
Adding pictures
Pictures speak better than words, especially in presentations.
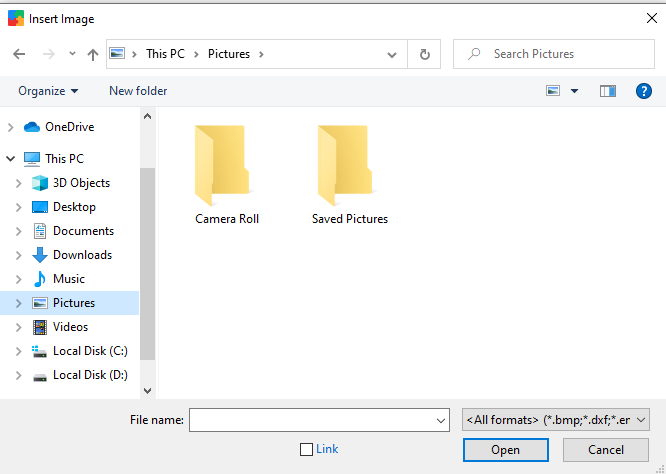
Inserting images from a file
- Go to Insert > Image > from File. You can directly click the Insert image after creating a slide too.
- Select an image from the respective file.
- Keep Preview on to see how it fits the slide.
- Click Open and the image appears on the slide.
- If you click the Link option, the image appears as a link in the slide.
Inserting images from scanner
Make sure the scanner software is installed and configured with Nebula Office.
- Switch on the scanner and keep the image.
- Navigate to Insert > Media> Scan > Select Source.
- Select the scanner from the select source dropdown.
- Click Create preview/ preview for assistance. You can adjust the image according to the preview.
- In the Preview area, you can crop the scanned image too.
- Now click Scan.
Impress automatically inserts the scanned image to your slide.
Inserting images from Gallery
- Navigate to the Main menu and Tools > Gallery.
- You can click the Gallery icon on the Drawing toolbar to open the dialog box.
- Choose a theme on the left pane.
- Select a suitable image on the right pane.
- Click the image. Drag and drop it on the slide.
- Resize this image if you wish.
The gallery has several other options like adding images to themes. You can manage the gallery and create new themes. This helps you explore many themes for your slide.
Adding tables
The use of tables makes understanding easy. They ease the process of explaining. The functionalities for tables in Impress are less than Calc. This is because they are used in slides. Now let’s know about using tables in Impress.
Inserting a table to your slide
- Click the slide in which you want the table.
- Modify the layout to fit the table.
- Now go to Insert and click Table on the main menu.
- You can also click the Table icon on the standard toolbar.
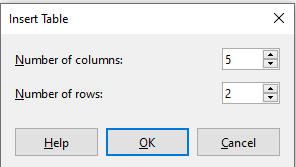
- The table dialog box opens.
- Input the number of columns and rows.
- Click OK.
Now the table displays at the center of the selected slide.
There is another way to insert tables.
- On the right of the Table icon, there is a small triangle. Click it.
- The table graphic insert tool opens.
- Input number of columns and rows. Now left-click on the mouse.
- The table appears on the slide.
Now, keep the Table Design subsection open. This is in the sidebar.
- Click on one predefined style (colors) according to your wish.
- Now drag and move the table in the slide.
Editing and modifying table
You can modify the table using Table Design. This has the following options.
- Header row
- Total row
- Banded row
- First column
- Last column
- Banded column
You can select any of these to add/remove the background. You can also set a different color for a row/column.
Apart from the Table Design, there is a Table toolbar. In this, you have several options. Just select the table and these tools appear. If not go to View > Toolbars > Table. You can merge, insert, delete, split the table cells. The toolbar can change the font, include border, background, etc.