If you use Nebula Office you may need to work with spreadsheets, containing rows and columns. Let’s start learning how to work with rows and columns.
Add rows and columns
Whether you want to add a single row/column or multiple ones, there are two ways in doing so. You can use the ‘Sheet’ tab or do the task simply by using your little mouse!
Using Sheet:
- First, use the mouse to select the column/row, near which you want to add another one. You can do this above or below it. The next step will make it clear as to how to do it.
- After selecting, click on the ‘Sheet’ tab in the Menu Bar. Then you will see the ‘Insert’ option.
- You will get four options:
- Insert Columns Left
- Insert Columns Right
- Insert Rows above
- Insert Rows Below
- All these options are self-explanatory. In addition, you may click on any of these to add a single row/column, in orientation with the ‘selected’ row/column.
Using your mouse:
- The first step is the same. Now, you can select the row/column where you want to insert another.
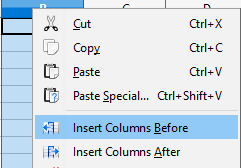
- Then right-click on it, or right-click on the row/column header.
- This will again show you options, depending on whether you have selected a row or a column.
- It will have many options, including ‘Insert Columns Left’ and ‘Insert Columns Right’ if you selected a whole column.
- And you will see two options named ‘Insert Rows above’ and ‘Insert Rows Above’ if you have selected a whole row.
- Click on the option according to your choice or need and you will see that the insertion is done. It will also change the serial number by itself.
Working with them is so easy. Right?
Add multiple rows and columns
Now, what if the same needs to be done for multiple rows/columns. Will you repeat the above-stated steps time and again?
Here is a simple way to achieve this in less than a minute! Follow these steps:
- First select the number of rows/columns you want to add, by dragging over with the left mouse button.
- Then right-click and find the above-stated options. All the next steps are the same, except for the output of course!
- It will add a number of rows/columns, whose count is the same for the selected ones.
Congrats, you have excelled at adding rows and columns. Now let us move on to deleting them. This is essential to learn because what if you make an unintentional mistake in adding them, or what if you inserted one at a wrong place. You may need to delete a row or a column for a number of reasons. Let us follow them up!
Deleting rows, columns, and cells
This action can be successfully done in two ways:
- Firstly, select a cell in the row or the column you want to delete, then find the ‘Sheet’ option in the menu bar.
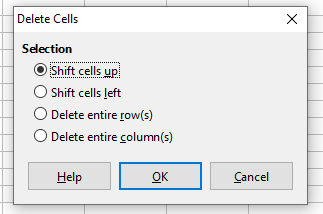
- You will find an option named ‘Delete Cells’. Click on that and a dialog box will appear. It will show up a few options.
- Using these four options, you can shift the cell up or left, or delete the whole row or column. Since we want to delete the row/ column, consider the last two options, and choose between them, depending upon the need.
There is another way to achieve the same!
- The first step is still the same. Select the row or column or its header.
- The ‘Sheet’ menu bar will again help. Click on that and right-click on ‘Delete Cells’ and simply select Delete Columns/ Delete Rows.
Deleting multiple columns or rows is the last thing we are discussing in this article. Let us buckle up to understand that too!
- First, select the number of rows or columns by dragging, using your left mouse button.
- Then go to the ‘Sheet’ menu bar and click on the ‘Delete Cells’. Choose from the Delete row or the Delete columns option.
This will successfully delete all the selected rows/ columns.
Conclusion
If you struggle a bit while working with rows and columns while doing some important work with the spreadsheets, here is your full guide to understand the same clearly and work with them easily. The article will help you use Nebula Office in a better way.