Nebula Office for Windows is presenting a suite of Office productivity software for its users. It is compatible with all OpenOffice formats for Windows. Nebula Office, which is suitable for entry-level to advanced users, is a great alternative to Word, PowerPoint, and Excel.
Nebula Office also comes with a light PDF editor, a vector graphics and flowcharts drawing program, a database editor, and math formula software. Moreover, it supports opening and editing most of the office file formats.
Nebula Office works with well on all Windows 10 version that are x86 based. If your PC meets these requirements, Nebula Office works the best.
Tools in Nebula Office
The main applications in Nebula Office include Writer, Calc, Impress, Draw, and Math Formula.
You can use the Writer application for creating documents just like in Microsoft Word. Calc is a great alternative to Excel which you use to create spreadsheets. Impress is for creating presentations and slides. You can utilize the Draw to generate all kinds of diagrams. The math formula is suitable for advanced users.
In this article we we see about how to embed / link graphics to a document.
Embedding graphics in Writer
The Writer tool in Nebula Office is used to work with graphics. You can insert image files including photos, drawings, scanned images, and screenshots. Diagrams done with the Draw application are also included. Charts that are created using the chart component in Nebula Office can also be inserted as graphics.
An image is inserted directly from the graphic program or even a scanner. It is either drag, drop or copy and paste.
Using the drag & drop method
- Open the browser and locate an image.
- Simply drag this image and drop it into the document.
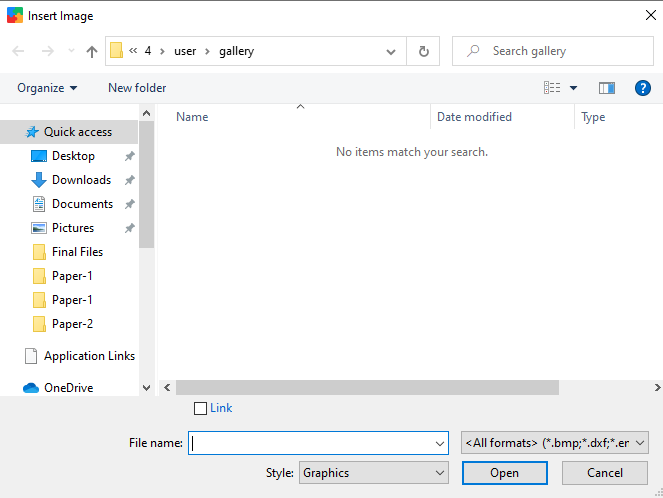
Inserting image
- Open the document in which the image needs to appear.
- Select Insert and then Image in the sidebar.
- The Insert Image dialog appears.
- Go to the image that you insert in the document.
- Select the image and press open.
To link the image, select the Link Option at the bottom of the dialog box. Then click Open. Another dialog box appears asking if you want to embed or keep the link. Click the Keep Link Option to create the link of the image.
Options to embed images, spreadsheets, and other objects
You can insert an image into a document in the following ways.
- From clipboard
- From gallery
- Using scanner
- Making it a background
Now let’s explore these options to know how to embed graphics.
From clipboard
- Open the source document with the graphics or spreadsheet.
- Open the target document to embed the graphics/spreadsheet.
- Click the image/spreadsheet and press Ctrl+C to copy.
- Go to the target document and press Ctrl+V to paste the image.
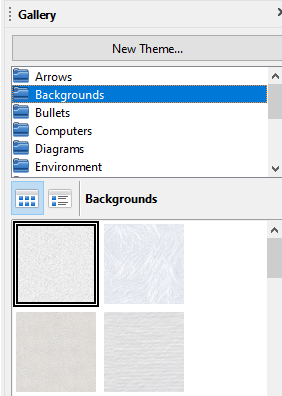
From gallery
- Select the Gallery on the sidebar.
- Choose a theme and select the object with a single click.
- Use drag & drop method to insert graphics into the document
To insert a link from the gallery, press Insert>Media>Gallery and choose a theme. After selecting the object, use Ctrl+Shift as you drag. The link will be created.
Using a scanner
- Connect the scanner to the device.
- In the slidebar, select Insert>Media >Scan>Select Source.
- Then place the cursor where you require the graphic.
- Now press Insert>Media>Scan>Request.
You can also scan the image, add it to the graphic program, and clean it. Doing this before inserting can improve image quality.
Making it a background
- Select Insert >Media>Gallery.
- Choose a theme.
- Select the object with a single click.
- Now press Insert as background>Page or >Paragraph
This displays the image as the background of a page or a paragraph alone.
Embedding a linked image
You can use this to embed an image that was inserted as a link.
- Select the document with the image link.
- Select Edit in the sidebar and click Links to external files.
- Edit Links dialog is visible to you with all linked images.
- Go to the source file list and click on files to change to embedded from linked.
- Then press the Break Link button.
- Click the Close button and save this document again.
However, changing the embedded image to a link does not follow this method. You need to replace the image and select the Link option as you replace it.
On an endnote
The embedding or linking graphics/spreadsheets enhances your document. You can use these methods to create appealing documents through Writer. This is a good advantage of using Nebula Office.
Read more articles