Nebula Office is a suite created for office and business needs. It has all the required tools like Writer, Calc, Impress, Draw, and math formula. These are helpful in producing word documents, spreadsheets, and more. The writer of the Nebula Office is the tool that one uses mostly. It helps you in completing word documents effectively.
Nebula Office is compatible with most Windows versions. There is an additional light PDF editor, vector graphics, and other software tools too. This makes Nebula Office extremely usable. Editing and opening all file formats is also possible with Nebula Office.
All levels of users from entry to advanced can use this platform. It’s simple to start and will not need any advanced technical knowledge.
Writer and its uses
Writer is one of the tools available on the Nebula Office. You can create, open, and edit any word documents. It comes with several other features to make your documents complete. There are different templates, drawing tools, fonts, and many more. Now let’s learn about export to PDF options on Writer.
Exporting to PDF
With Writer, you can easily export documents to PDF. These files are suitable for viewing on any PDF reader. This is because the PDF file is created in an industry-standard size format. Once you export the document, the software saves a copy of it in the same format.

Quick Export
After completing the document, simply click the Export as PDF icon, which is to the left of the Print icon. Now enter the file name and location to save this PDF file.
Ways to keep control on quality and content
To maintain the original quality while exporting, use this method.
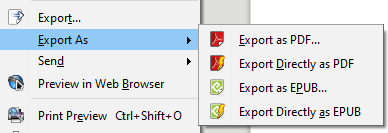
- Go to File > Export As and select Export as PDF.
- As the PDF Options dialog box opens, select the appropriate settings.
- Then, select Export.
- Enter the location and a name. Click Save to complete the task.

This will help you keep the quality and content in control.
Inside the PDF Options dialog box
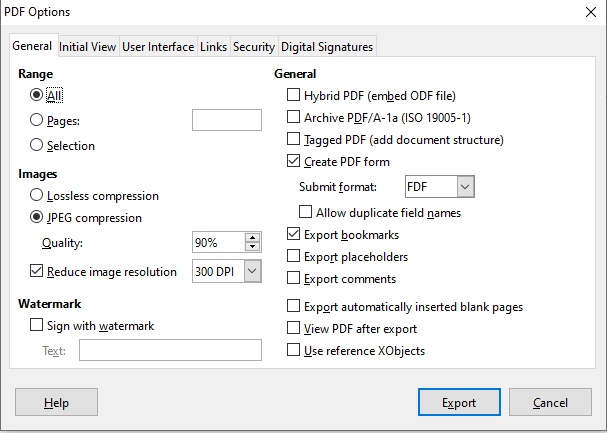
There are six pages in this dialog box. They are General, Initial View, User Interface, Links, Security, and Digital Signatures. Let us understand these pages one after the other.
General page
On this page, you can select the number of pages to export. You can also select the type of compression for the image.
1. Range:
- The All option will export the entire document.
- The Pages option will export only the selected range of pages. This is either a single page or a combination of pages.
- The Selection option will export only the currently selected material as PDF.
2. Images:
- Lossless compression helps you store the images without loss of quality.
- JPEG compression helps you adjust the varying degrees of quality.
- Reduce Image resolution will have a lower DPI. This will have images with lower quality. The Higher DPI will increase the size of the file.
3. Watermark:
Sign with Watermark will display the text you enter in the Text field. This will appear for the entire PDF file.
4. General
This allows you to select the kind of PDF you want to export. These are the types available.
- Hybrid PDF or embed ODF file
- Archive PDF
- Tagged PDF
- Create PDF form – Submit format
- Allow duplicate field names
- Exporting bookmarks
- Export comments
- Export automatically inserted blank pages
- View PDF after export
Note: You can export headings, pages/slides, and draw documents as Bookmarks. This is the table of contents displayed on PDF viewer.
Initial View page
This helps you to open the PDF on the PDF viewer. The selections made here are self-explanatory.
User Interface page
On this page, you can control how the PDF will look on the PDF viewer. This includes window open selection, user interface options selection, transitions, and bookmarks.
For selecting bookmarks, you need to select Export Bookmarks on the general page. The heading levels are displayed as Bookmarks.
Links page
This page helps you to choose how the links are exported in PDF. You can export bookmarks as named destinations, convert document reference to PDF targets, export URLs to the relative file systems, and cross-document links.
Linking bookmarks as named destinations happen when you define them. This will export bookmarks as named destinations on web pages and PDF documents.
Security page
This page can encrypt the PDF file after exporting. There are options for encryption. These are open passwords, permission passwords, both open & permission passwords. Just click the Set password button to apply security settings for PDF files.
Digital Signatures page
You can export the PDF after digitally signing it. There is a certificate password, location, contact information, reason, and time stamp authority on this page.
Read more articles
