Nebula Office helps you to create appealing presentation documents. There are tools to aid you in creating different documents. You can create, edit, or delete documents according to your need. This is a great alternative to MS Office. It is highly suitable for both office and home purposes. This is compatible with most of the Windows versions. Nebula Office also has many added features.
In this article, we will know about creating a photo album in the Nebula Office. It has tools like Writer, Calc, and Impress. You can create an album with the help of Impress.
Knowing Impress
Impress is the presentation program in Nebula Office. It helps you create slides, present them as slideshows, etc. Impress is a compatible tool to create promising presentations. There are a number of elements in Impress. It helps you make comparison charts, graphs, tables, lists, and more.
You can also create appealing photograph albums. There are many other graphic features too. You can create slides that are simple and sophisticated too. When you know how to work with its features, it is even simpler.
How to create a photo album in Impress?
With a set of images, you can create an album. You can display this album in a slideshow. You can also add graphics to your album. This is the best way to create an album to cherish your memories. You can keep separate presentation files for every trip. This is a good way to keep your photographs organized. You can anytime watch the slideshows.
All you need to do is insert photographs into the presentation. Here is a way to insert a photo album into a presentation.
- Go to Impress and open a blank presentation.
- You can also do this in an existing presentation.
- Select the slide where you want the photo album.
- Now go to Insert > Media.
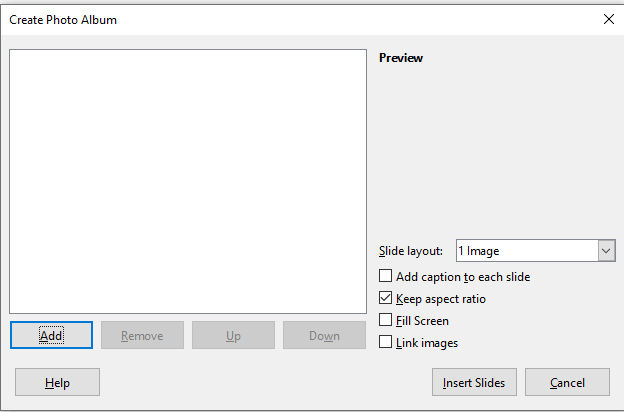
- Select Photo Album and the photo album dialog box appears.
- Now click Add and the browser appears.
- Here you can locate the files to insert.
If there are many photographs in the same folder, make use of Shift/Ctrl. This selects a group of pictures. Make sure to select them as you click on their file names.
- Now click Open to add the selected files to your album.
- You can click one file name to display in the Preview area.
- This is there on the photo album dialog box.
- In the Side Layout box, set the number of photographs per slide.
- You can insert a text box for it in the Add caption to each slide option.
- You can order the images with their filename. Just move them up and down.
- After a sequence is complete, click Insert Slides.
Now Impress will create your presentation. The number of slides is according to the number in Slide Layout. For the caption option, a placeholder appears next to each image. You can change the order of images just like changing slides.
Creating a slideshow
Once the images are ready in the presentation, you need to create a slideshow. You can customize the slides that you want in the slideshow.
- Select all the slides you want in the custom slideshow.
- Now go to Slideshow > Custom slideshow.
- Press New Button to save selected slides in a new name.
You can repeat this to create one or more slideshows from a single presentation.
Adding transitions for slides
Transitions for slides are animations that appear in a slideshow. You can use different animations for each slide. This will make your slideshow very interesting to watch.
- Go to slide > slide transition on the menu bar. You can also click the slide transition on the sidebar too.
- Now choose the desired transition. Choose the animation speed also.
- You must also select if the transition should appear automatically or with a cursor.
- Now click Apply to All Slides.
- You can also select different transitions for each slide.
![]()
In the slide design area, you can see a preview of the slideshow. To see this, tick the checkbox Automatic Preview.
Running the slideshow
Once the album, slideshow, and transitions are synced, it’s time to run. Running the slideshow is necessary when you have to present the file.
- Press slideshow > Start from the first slide on the menu bar.
- You can also click start from the first slide icon on the presentation toolbar.
- Now press F5.
- On slide advance, set Automatically after X sec or On mouse click. Make it according to your preference.
- Press Esc to exit the slideshow.