While working with Nebula Office, you might come across CSV files! What are these? Read on, to know all you need to know about how to work with CSV files in Nebula Office.
CSV files are the ‘Comma separated files‘. These are actually the spreadsheets. We open them in Excel. But when you open these spreadsheets in text format, you get CSV files. These files contain the exact content, but a comma or a semi-colon separates the content in every cell.
Each line in a CSV file is actually the whole row in the spreadsheet format. So, to conclude, CSV files are the spreadsheets that you access in the text formats. There is something more you need to know. In CSV files, every text is present inside the quotation marks, but not the numbers. They are present as such in the normal text, separated by commas.
How to open CSV files?
Now, this is a common question, while you are working with CSV files. If the file you are using is a word or a simple PDF file, it would be far easier for you to open, access, and understand that. But, since this is a special format- CSV, you need to understand some things and this question is expected and is well answered below!
To open a CSV file in the Calc, following are the steps you need to follow:
- The very first step is to click on the ‘File’ in the menu bar. A list of further options appears, locate the ‘Open’, and click on that since you want to open a file. This is self-explanatory and in fact, you might be expecting this option.
- Then keeping the directory of the CSV file, you want to open in your mind, go to that path and locate the file. Simply click on that and it will appear with a .csv or .txt file format. No issues with that! CSV files exist in both the file formats.
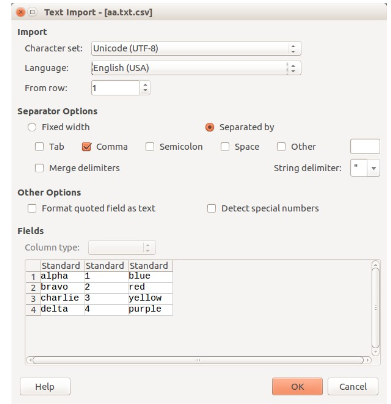
- On clicking on the ‘Open’ button, a dialog box will appear, called the ‘Text Import dialog box’. It will show various options for importing files and their additional features or custom options.
- Now, simply select the options for importing your CSV file into the Calc spreadsheet.
- To open your CSV file in the spreadsheet format, finally, click on the OK and import your selected CSV file.
Now, let us understand the options we get when we import a CSV file into your software:
Importing a CSV file in Calc
The Character Set:
You need to select it using the drop-down menu. It represents the character set that you want to import the file with.
Language:
Now the next option that you can choose is ‘Language’. More specifically, it determines how the ‘number strings‘ will get imported and treated while you access your CSV file.
There is one default language that this software will use.
If you want to know the default language set by the software, you can go to the ‘Options’ in the ‘Tools’ menu. Then go to ‘Language settings’ and then click on the ‘Default Languages for Document’. This will show you the default language, and you can change the same too.
From Row:
If you are following these steps, this option will ask you for a number. By default, that will be 1. This represents the row number to start with. You will see a preview of the upper rows at the bottom of the dialog box. You can set and choose the right number for rows.
Other Useful Options
Many other additional features include:
- Fixed width: This option allows you to set a fixed width between the columns. You can also adjust the width from the preview at the bottom by simply dragging and adjusting.
- Separated By: This option gives you an option to select the character with which you want to separate the data of the file. You can choose comma, semicolon, tab, space, or any other character of your choice.
- Trim and Merge: Merge delimiters, Trim spaces, and String delimiter are some other very useful options available. ‘Trim spaces’ helps you to delete the trailing unwanted spaces and the delimiters delimit the text data.
Conclusion
If you are trying to work with the CSV files for the first time, this article will guide you to work around it.