Nebula Office has emerged to be a great alternative to Microsoft. It is compatible with Microsoft, Google Sheets, Google Documents, and the entire collection of Open Office file formats for Windows.
With the use of documents, creation, and filling up of forms has become an integral function. Read below to know more.
About Forms
You will find some sections that you will not be able to edit in a form. If you are a reader and want to make changes to certain sections in a form you can do that. A form is created with the help of Nebula Office Writer. Writer provides several ways to feed information into a form. You can insert checkboxes, option buttons, text boxes, pull-down lists, and many other options.
Three ways to use forms
- You can use it to create a simple document. It can be a questionnaire.
- You can use it to link into a database or data source. A user will enter the required information. If you use forms to access a database it offers a fast and easy way to build complex graphical front ends.
- Forms can also include text, graphics, tables, drawings, and other elements.
Creating a form
1. The toolbars for form creation
Click File > New > Text Document to create a new Writer document. To create forms in a Writer document, you first need to have access to two toolbar controls: Form Design and Form Control. To do so:
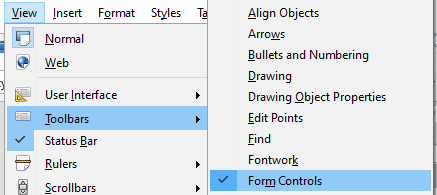
- From the main menu, click View > Toolbars > Form Control
- then, click View > Toolbars > Form Design
The Form Controls toolbar has an icon for each of the most commonly used types of control.

2. Turn on the Design Mode
To activate the Design mode, click the Design Mode icon (highlighted above) on the Form Controls toolbar to turn the design mode on or off. Once you do this it will activate or deactivate the form design icons. These icons can be used for inserting form controls and selecting controls for editing.
3. Insert Form Controls
Next, insert Form Controls and configure them to look and behave as you want. You can double-click a form control or right-click a form and select Control… within the document.
Your form is ready to be used.
Access the data sources
The most common use for a form is to input information into a database. Since it is a part of the Writer document, the form contains graphics, formatting, tables, and other elements to make it look just the way you want. You can modify the form as well. It is as simple as editing a document.
Filling up forms
Once you have created a form and tied it to a database, you can use it to enter data into the database. You can also modify the data.
- You must make sure that the form is not in design mode.
- Also, ensure that the Form Navigation toolbar (View > Toolbars > Form Navigation) is on.
- If there is any existing data in the data source, you can use the control buttons on the Form Navigation toolbar to look at different records. If you want to amend data in a record, edit the values in the form. After you have made the changes, press Enter with the cursor in the last field to submit the changes. You will find that the record is saved and the next record is displayed.
- If there is no data in the form, you need to enter information by typing into the fields of the form. If you want to submit the new record, press Enter with the cursor in the last field.
Conclusion
Nebula Office has paved a path for all its users to perform various functions very easily. The features are easy and convenient to apply. With the help of this Nebula Office technology, you will have access to various features. The features shall help you to perform each and every task easily and conveniently. You can work with documents, spreadsheets, and presentations tasks easily.
Read more articles