View Menu: Toolbars

From Audacity Development Manual
Jump to: navigation, search
Toolbars provide quick access to many functions in Audacity. In some cases the functions provided by a toolbar are available only through that toolbar. Other than the Spectral Selection Toolbar and the Scrub Toolbar, all toolbars are enabled by default. If your desired toolbar is not visible, choose View > Toolbars and click to put a checkmark by the toolbar you wish to enable.
View Menu has commands that determine the amount of detail you see in all the tracks in the project window. It also lets you show or hide Toolbars and some additional windows such as Undo HistoryTransport Menu commands let you play or stop, loop play, scrub play or record (including timed and sound activated recordings)Tracks Menu provides commands for creating and removing tracks, applying operations to selected tracks such as mixing, resampling or converting from stereo to mono, and lets you add or edit labelsGenerate Menu lets you create audio containing tones, noise or silenceAudacity includes many built-in effects and also lets you use a wide range of plug-in effectsThe Analyze Menu contains tools for finding out about the characteristics of your audio, or labeling key featureThe Tools Menu contains customisable toolsThe Extra menu provides access to additional Commands that are not available in the normal default Audacity menusThe Help Menu lets you find out more about the Audacity application and how to use it.  It also includes some diagnostic tools.Zoom in/out on the horizontal axisControls the sizes of tracksMove forward/backwards through the audioBrings up the History window which can then be left open while using Audacity normallyBrings up the Karaoke window, which displays the labels in a "bouncing ball" scrolling displayMixer Board is an alternative view to the audio tracks in the main tracks windowToolbars can be used to determine which of the Audacity toolbars are displayedShows extra menus with many extra less-used commandsOption to show or not show audio that is too loud (in red) on the wave formUsing this command positions all toolbars in default location and size as they were when Audacity was first installedControls playback and recording and skips to start or end of project when neither playing or recordingChooses various tools for selection, volume adjustment, zooming and time-shifting of audioDisplays recording levels and toggles input monitoring when not recordingDisplays playback levelsAdjusts the recording and playback volumes of the devices currently selected in Device ToolbarCut, copy, paste, trim audio, silence audio, undo, redo, zoom toolsPlays audio at a slower or faster speed than normal, affecting pitchControls playback and recording and skips to start or end of project when neither playing or recordingSelects audio host, recording device, number of recording channels and playback deviceControls the sample rate of the project, snapping to the selection format and adjusts cursor and region position by keyboard inputIndicates the current time position, read-onlyDisplays and lets you adjust the current spectral (frequency) selection without having to be in Spectrogram viewThe MenusView-ToolbarsMenu.png
Click for details
Click on the image to learn more


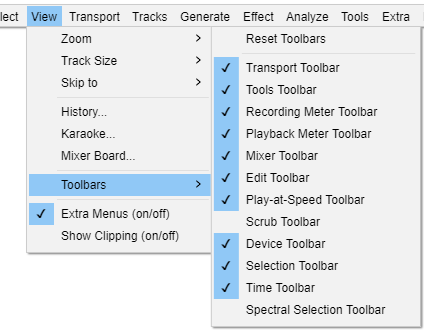
This menu shows and hides toolbars. For details of the toolbars and what they do, see Toolbars Overview.
  • Click on the check marks to hide or show a toolbar.
  • Click on 'Reset Toolbars' to get back to the default selection and position of toolbars.

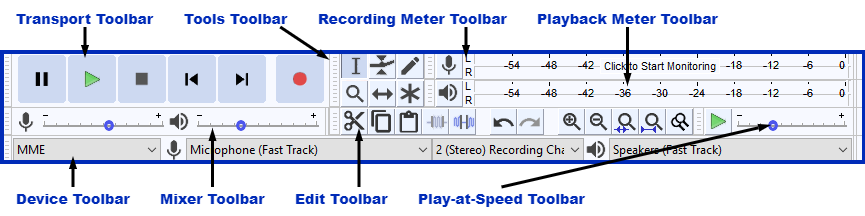
Toolbars - upper and lower dock areas

There are two dock areas for toolbars in Audacity. By default, most of the Audacity toolbars are in the upper dock, with only the Selection Toolbar in the lower dock.

Toolbars can be arranged and resized within either of the two docks, or floated free of the docks.

Upper Toolbar dock area

Transport Toolbar for Play, Record, Pause, Stop, Start and EndFor Play, Record, Pause, Stop, Start and EndDevice Toolbar for choosing playback and record devicesFor choosing playback and record devicesTools Toolbar for selecting edit mode, e.g. envelopesFor selecting edit mode, e.g. envelopesMixer Toolbar for adjusting record and playback volumeFor adjusting record and playback volumeRecording Meter Toolbar for measuring recording volumeFor measuring recording volumeEdit Toolbar for Cut, Paste and ZoomingFor Cut, Paste and ZoomingPlayback Meter Toolbar for measuring playback volumeFor measuring playback volumePlay-at-Speed Toolbar for adjusting playing speedFor adjusting playing speedTopDockAnnotated.png
Click for details
Click on the image to learn more


Lower Toolbar dock area

Selection Toolbar for selecting time rangeFor selecting time rangeTime Toolbar for viewing current play/recording timeFor viewing current play/recording timeLowerDockAnnotated.png
Click for details
Click on the image to learn more


Additionally if you choose to show the Spectral Selection Toolbar from the View Menu (it is not shown by default) then it will also be shown in the Lower Toolbar dock area by default.

Spectral Selection Toolbar includes controls for manipulating a Spectral Selection. Using the "Center Frequency" and "Width" boxes, or the "Low Frequency" and "High Frequency" boxes, you can create or adjust a precisely defined spectral selection without having to click or drag with a mouse in Spectrogram view.Spectral Selection Toolbar green-boxed 2-4-0.png


Reset Toolbars  

Using this command positions all toolbars in default location and size as they were when Audacity was first installed.


<  Back to: View Menu